# Kubernetes网络
# Service
# Service存在的意义
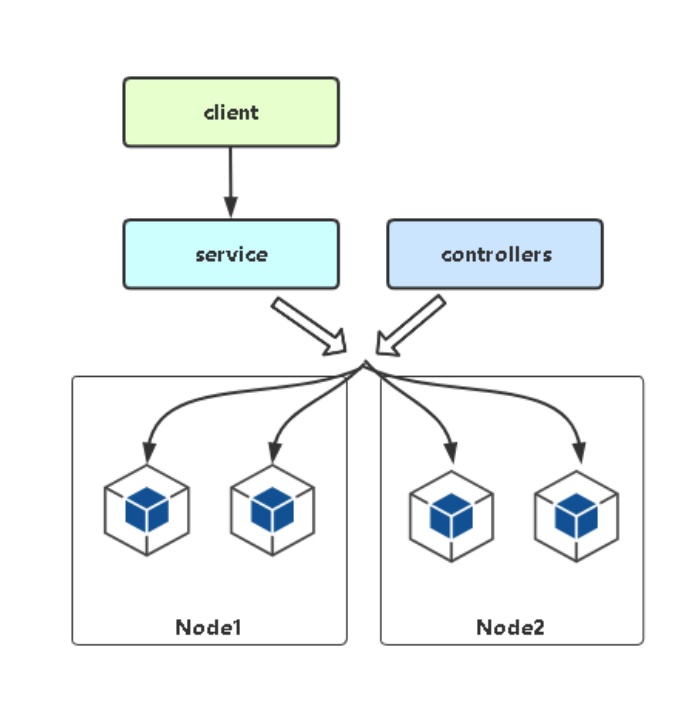
防止Pod失联(服务发现)
解决Pod的IP不固定的问题,添加一个控制器负责动态获取列表IP,动态更新到负载均衡器配置
定义一组Pod的访问策略(负载均衡)
Pod是多副本的,在前面添加一个负载均衡器,通过负载均衡器统一访问Pod
引入service是为了解决以上两个问题
# Pod与Service的关系
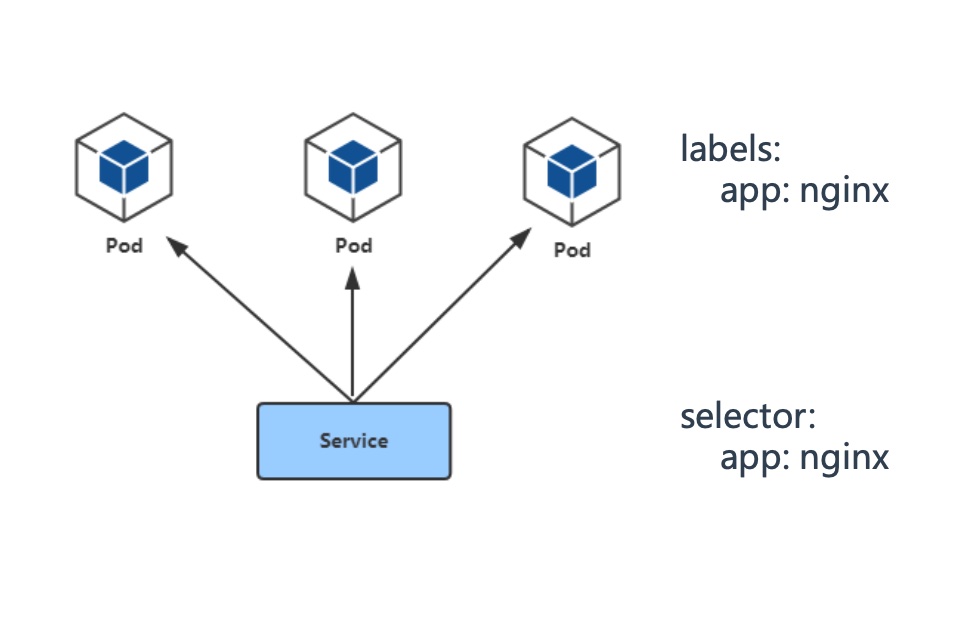
- 通过label-selector相关联
- 通过Service实现Pod的负载均衡( TCP/UDP 4层)
- 下面通过一个简单的例子解释相关参数
# 一个基本的yaml
apiVersion: v1
kind: Service
metadata:
  labels:
    app: web
  name: web
spec:
  type: NodePort    # 暴露类型
  ports:
  - port: 81        # service(负载均衡器)端口,只能在k8s集群内部访问(node和pod)
    protocol: TCP   # 协议
    targetPort: 80  # 容器中服务的端口
    nodePort: 30002 # 每个节点可以访问的端口
  selector:         # 标签选择器,这里用来关联Pod, 这里是指关联打有标签app=web的pod
    app: web
# 一个nginx的配置
upstream web {
	server 127.0.0.1:80;		 # 当前port对应targetPort
}
server {
	listen 127.0.0.1:81;         # 当前port对应port
	server_name blog.lxlit.cn;
	location / {
		proxy_pass http://web;
	}
}
# 负载均衡器四层和七层怎么理解?
- 四层和七层都是指OSI七层模型。
- 四层传输层,基于IP+端口转发
- 七层应用层,基于应用层协议转发,例如HTTP(域名、Cookie、Request)
# Service三种类型
ClusterIP
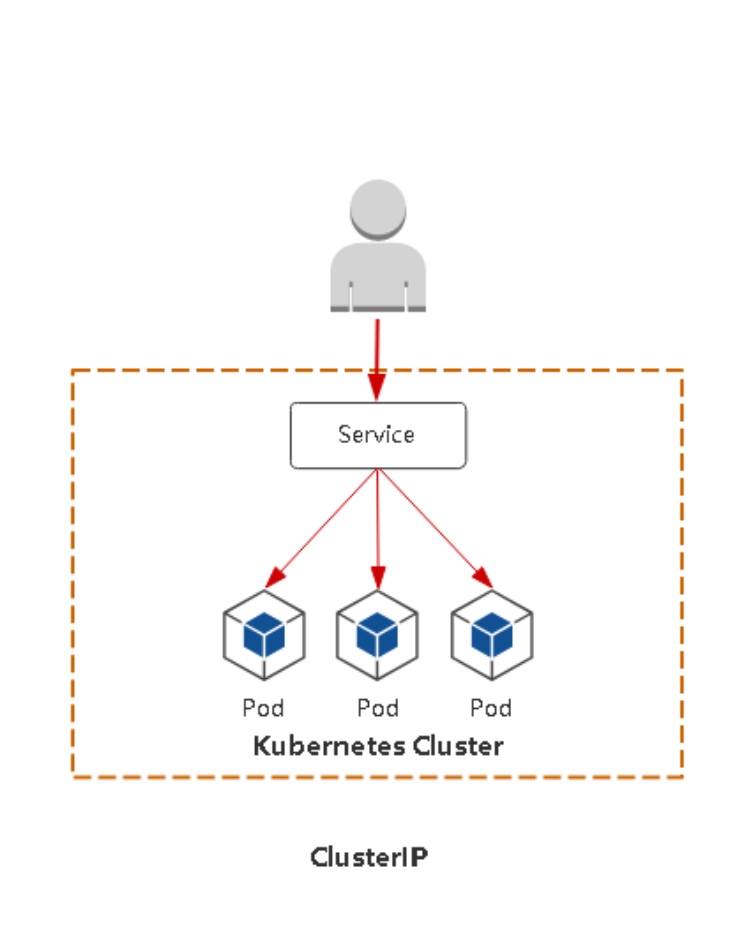
集群内部使用,类似于公有云的内网ip,用于内部访问,内部通信
默认,分配一个稳定的IP地址,即VIP,只能在集群内部访问(同Namespace内的Pod)
一个简单的yaml
apiVersion: v1
kind: Service
metadata:
  labels:
    app: web
  name: web-cluster-ip
spec:
  type: ClusterIP
  ports:
  - port: 80
    protocol: TCP
    targetPort: 80
  selector:
    app: web
执行效果
$ kubectl get svc
NAME             TYPE        CLUSTER-IP      EXTERNAL-IP   PORT(S)        AGE
web-cluster-ip   ClusterIP   10.96.112.69    <none>        80/TCP         118s
说明
只能在集群内部通过80端口访问
NodePort
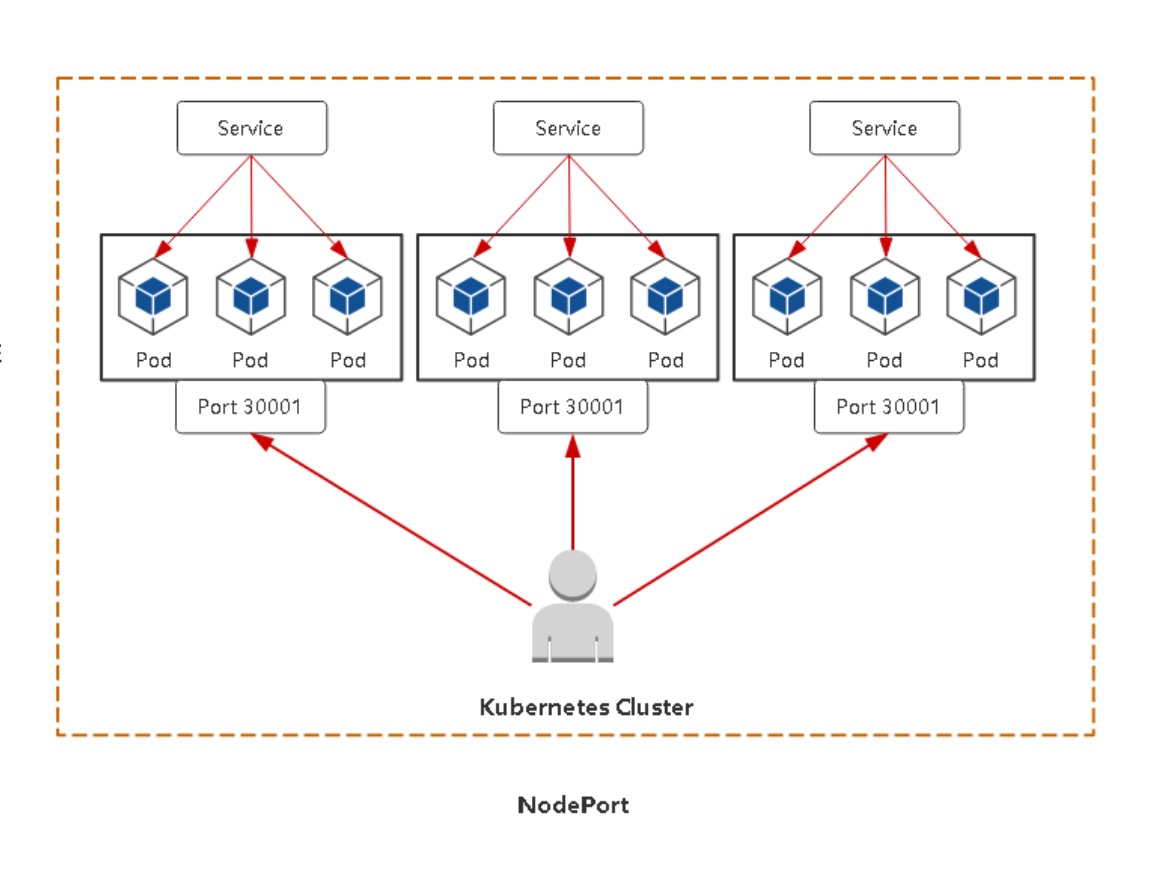
对外暴露应用,超出集群内部范围,让浏览器访问
一个简单的yaml
apiVersion: v1
kind: Service
metadata:
  labels:
    app: web
  name: web
spec:
  type: NodePort
  ports:
  - port: 81
    protocol: TCP
    targetPort: 80
    nodePort: 30002
  selector:
    app: web
执行效果
$ kubectl get svc
NAME             TYPE        CLUSTER-IP      EXTERNAL-IP   PORT(S)        AGE
web              NodePort    10.97.108.187   <none>        81:30002/TCP   5m27s
说明
可以在集群内部通过81端口访问,还能通过宿主机的30002端口,通过浏览器访问
nodePort范围:30000-32767
LoadBalancer
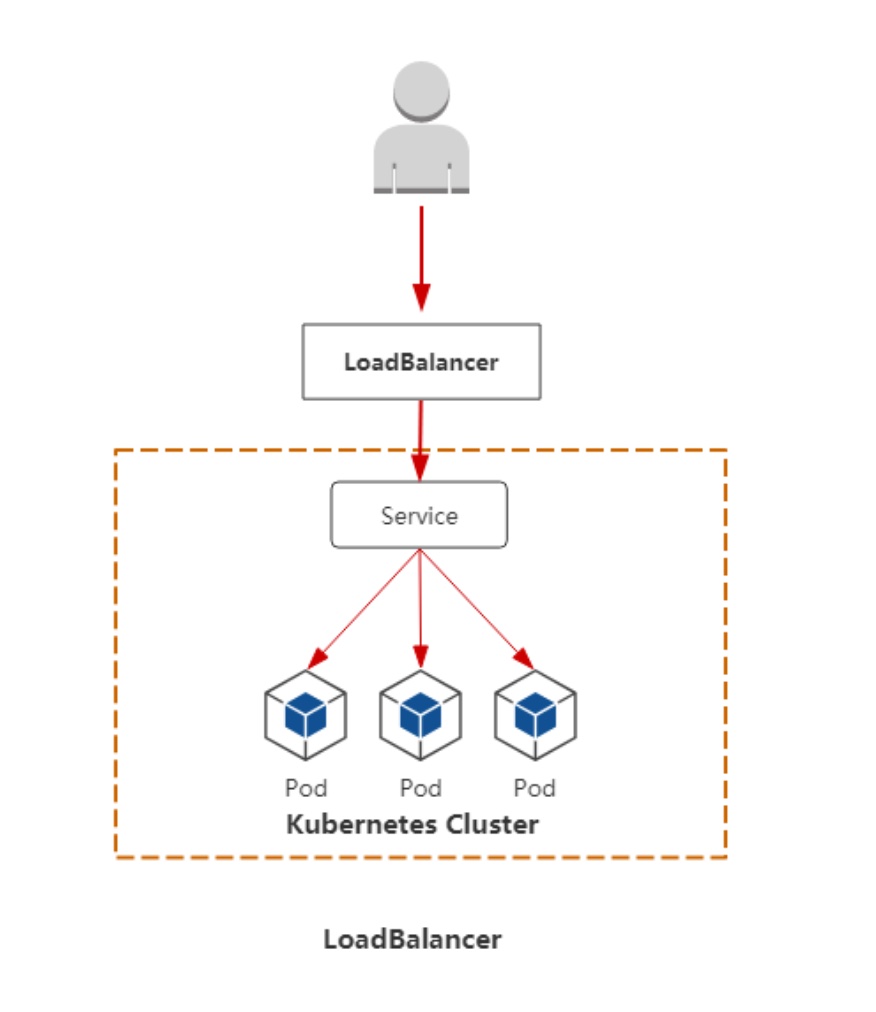
对外暴露应用,对接对外提供api的负载均衡器产品,一般适用于指公有云。
与NodePort类似,在每个节点上启用一个端口来暴露服务。除此之外,Kubernetes会请求底层云平台上的负载均衡器, 将每个Node([NodeIP]:[NodePort])作为后端添加进去。
# Service代理模式
# userspace(已弃用)
# Iptables(默认)
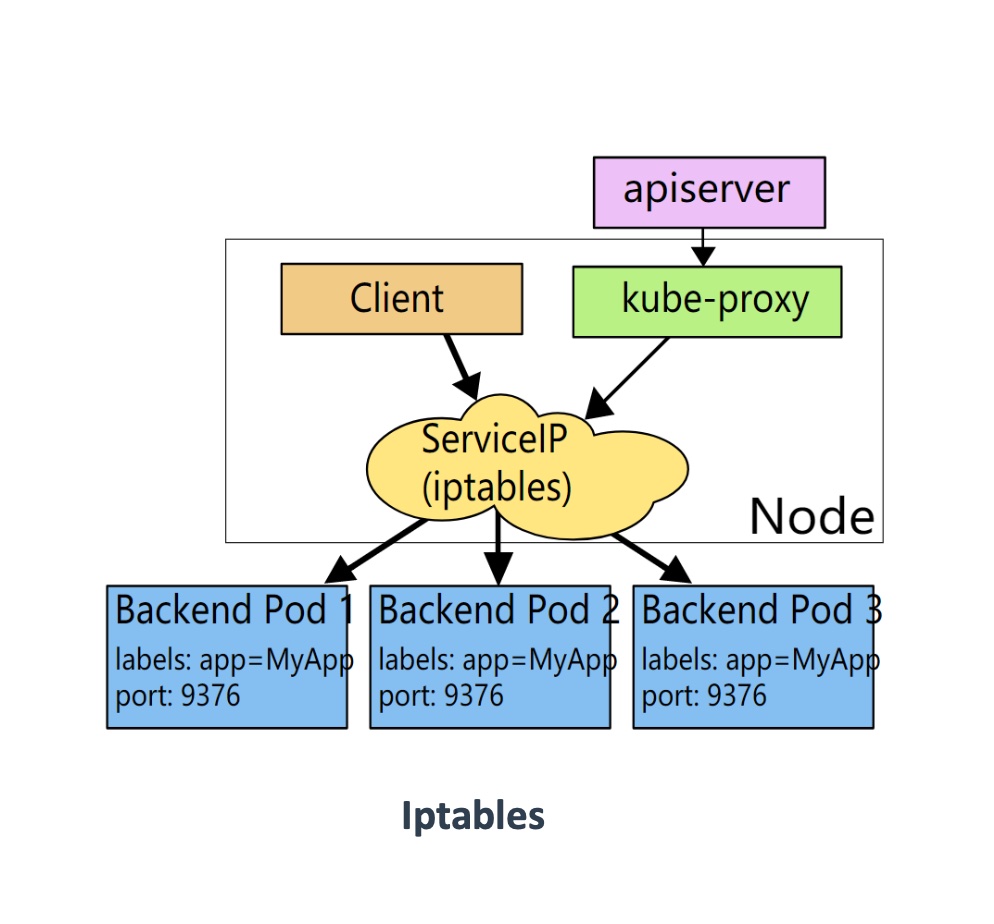
# 简介
Netfileter/iptables (以下简称iptables)是nuix/linux 系统自带的优秀且完全免费的基于包过滤的防火墙工具、它的功能十分强大、使用非常灵活、可以对流入、流出及流经服务器的数据包进行精细的控制。特别是它可以在一台非常低配置下跑的非常好。提供400台机器的办公上网共享服务丝毫不逊色数万RMB企业级专业路由器防火墙
Iptables 是linux2.4及2.6内核中集成的服务、其功能与安全性比老一辈ipvfwadm、ipchanins强大的多、一般认为iptables工作在OSI七层的、二、三层、四层。
# 查看负载均衡规则
iptables-save |grep <SERVICE-NAME>
# 访问流程
客户端 ->NodePort/ClusterIP(iptables/Ipvs负载均衡规则) -> 分布在各节点Pod
# 访问service的两种方式
通过浏览器访问(集群之外),通过nodeport方式
相比第二种方式多加了一条规则,为了接收nodePort的流量
-A KUBE-NODEPORTS -p tcp -m comment --comment "default/web" -m tcp --dport 30002 -j KUBE-SVC-LOLE4ISW44XBNF3G在pod中访问service或者node curl
第一步
$ kubectl get svc
NAME             TYPE        CLUSTER-IP      EXTERNAL-IP   PORT(S)        AGE
web              NodePort    10.97.108.187   <none>        81:30002/TCP   24h

$ iptables-save |grep web|grep 10.97.108.187
-A KUBE-SERVICES -d 10.97.108.187/32 -p tcp -m comment --comment "default/web cluster IP" -m tcp --dport 81 -j KUBE-SVC-LOLE4ISW44XBNF3G
第二步
$ iptables-save |grep web|grep KUBE-SVC-LOLE4ISW44XBNF3G
-A KUBE-SVC-LOLE4ISW44XBNF3G -m comment --comment "default/web" -j KUBE-SEP-JJQU2ZJFW4XFAEGZ
第三步
$ iptables-save |grep web|grep KUBE-SEP-JJQU2ZJFW4XFAEGZ
-A KUBE-SEP-JJQU2ZJFW4XFAEGZ -p tcp -m comment --comment "default/web" -m tcp -j DNAT --to-destination 10.244.17.177:80
# IPVS(lvs)
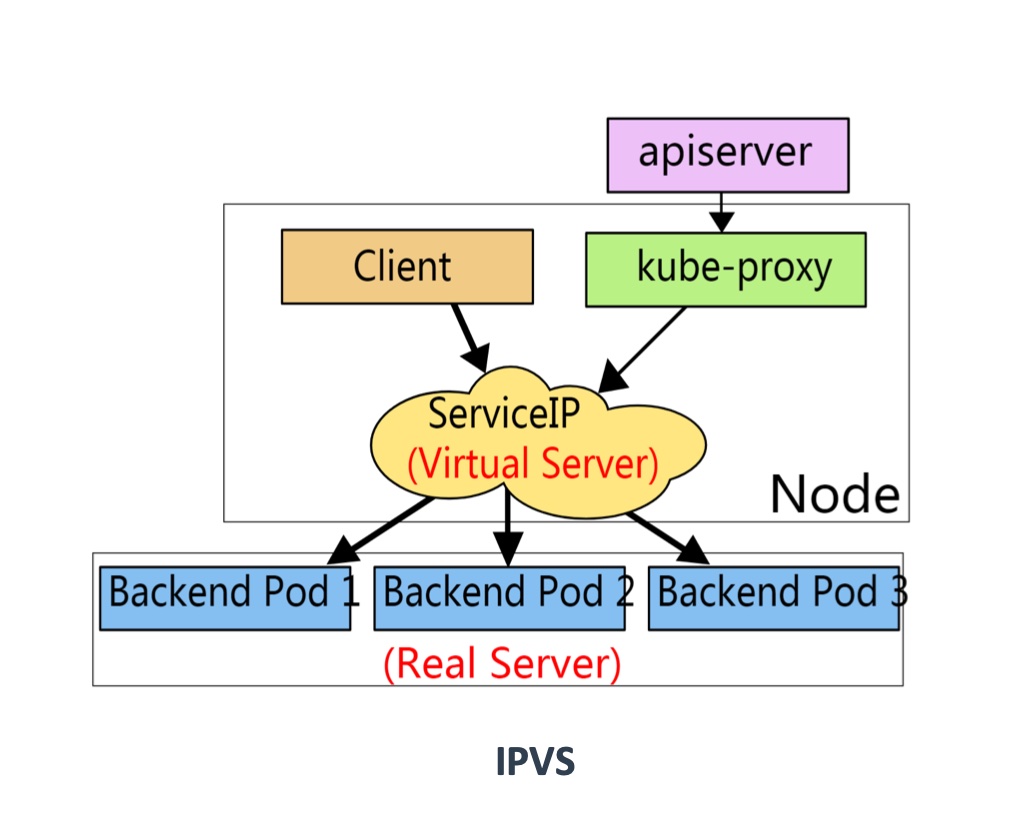
# 简介
PVS基本上是一种高效的Layer-4交换机,它提供负载平衡 (opens new window)的功能。当一个TCP连接的初始SYN报文到达时,IPVS就选择一台服务器,将报文转发给它。此后通过查发报文的IP和TCP报文头地址,保证此连接的后继报文被转发到相同的服务器。这样,IPVS不用检查到请求的内容再选择服务器,这就要求后端的服务器组是提供相同的服务,不管请求被送到哪一台服务器,返回结果都应该是一样的。但是在有一些应用中后端的服务器可能功能不一,有的是提供HTML文档的Web服务器,有的是提供图片的Web服务器,有的是提供CGI的Web服务器。这时,就需要基于内容请求分发 (Content-Based Request Distribution),同时基于内容请求分发可以提高后端服务器上访问的局部性。
# 查看负载均衡规则
ipvsadm -L -n
# 修改Iptables为IPVS
# kubeadm
$ kubectl edit configmap kube-proxy -n kube-system
...
mode: “ipvs“
...

$ kubectl delete pod kube-proxy-btz4p -n kube-system
注:
1、kube-proxy配置文件以configmap方式存储
2、如果让所有节点生效,需要重建所有节点kube-proxy pod

$ kubectl logs -f kube-proxy-22qgg -n kube-system
I0518 14:50:44.020917       1 node.go:172] Successfully retrieved node IP: 10.69.1.161
I0518 14:50:44.021061       1 server_others.go:140] Detected node IP 10.69.1.161
I0518 14:50:44.061198       1 server_others.go:206] kube-proxy running in dual-stack mode, IPv4-primary
↓↓↓↓↓↓↓↓↓↓↓↓↓↓↓↓↓↓↓↓↓↓↓↓↓↓↓↓↓↓↓↓↓↓↓↓↓↓↓↓↓↓↓↓↓↓↓↓↓↓↓↓↓↓↓↓↓↓↓↓↓↓↓↓↓↓↓↓↓↓
I0518 14:50:44.061354       1 server_others.go:274] Using ipvs Proxier.
↑↑↑↑↑↑↑↑↑↑↑↑↑↑↑↑↑↑↑↑↑↑↑↑↑↑↑↑↑↑↑↑↑↑↑↑↑↑↑↑↑↑↑↑↑↑↑↑↑↑↑↑↑↑↑↑↑↑↑↑↑↑↑↑↑↑↑↑↑↑
I0518 14:50:44.061383       1 server_others.go:276] creating dualStackProxier for ipvs.
W0518 14:50:44.061436       1 server_others.go:506] detect-local-mode set to ClusterCIDR, but no IPv6 cluster CIDR defined, , defaulting to no-op detect-local for IPv6
E0518 14:50:44.062427       1 proxier.go:389] can't set sysctl net/ipv4/vs/conn_reuse_mode, kernel version must be at least 4.1
W0518 14:50:44.062802       1 proxier.go:445] IPVS scheduler not specified, use rr by default
E0518 14:50:44.063134       1 proxier.go:389] can't set sysctl net/ipv4/vs/conn_reuse_mode, kernel version must be at least 4.1
W0518 14:50:44.063299       1 proxier.go:445] IPVS scheduler not specified, use rr by default
W0518 14:50:44.063374       1 ipset.go:113] ipset name truncated; [KUBE-6-LOAD-BALANCER-SOURCE-CIDR] -> [KUBE-6-LOAD-BALANCER-SOURCE-CID]
W0518 14:50:44.063404       1 ipset.go:113] ipset name truncated; [KUBE-6-NODE-PORT-LOCAL-SCTP-HASH] -> [KUBE-6-NODE-PORT-LOCAL-SCTP-HAS]
I0518 14:50:44.063778       1 server.go:643] Version: v1.21.0
I0518 14:50:44.072629       1 conntrack.go:52] Setting nf_conntrack_max to 131072
I0518 14:50:44.073324       1 config.go:315] Starting service config controller
I0518 14:50:44.073389       1 shared_informer.go:240] Waiting for caches to sync for service config
I0518 14:50:44.073418       1 config.go:224] Starting endpoint slice config controller
I0518 14:50:44.073447       1 shared_informer.go:240] Waiting for caches to sync for endpoint slice config
W0518 14:50:44.078839       1 warnings.go:70] discovery.k8s.io/v1beta1 EndpointSlice is deprecated in v1.21+, unavailable in v1.25+; use discovery.k8s.io/v1 EndpointSlice
W0518 14:50:44.082284       1 warnings.go:70] discovery.k8s.io/v1beta1 EndpointSlice is deprecated in v1.21+, unavailable in v1.25+; use discovery.k8s.io/v1 EndpointSlice
I0518 14:50:44.173907       1 shared_informer.go:247] Caches are synced for service config
I0518 14:50:44.174456       1 shared_informer.go:247] Caches are synced for endpoint slice config
从日志中标注出来的那部分,就可以看到已经修改成功了
# 二进制
$ vi kube-proxy-config.yml
mode: ipvs
ipvs:
scheduler: "rr“
$ systemctl restart kube-proxy
注:配置文件路径根据实际安装目录为准
# 执行命令查看规则
$ yum install ipvsadm       # 已安装的忽略该命令
$ ipvsadm -L -n							# 找不到ipvsadm这个命令的话,使用上一行的命令进行安装
IP Virtual Server version 1.2.1 (size=4096)
Prot LocalAddress:Port Scheduler Flags
  -> RemoteAddress:Port           Forward Weight ActiveConn InActConn
TCP  172.17.0.1:30001 rr
  -> 10.244.10.200:8443           Masq    1      0          0
TCP  10.69.1.160:30001 rr
  -> 10.244.10.200:8443           Masq    1      0          0
TCP  10.69.1.160:30002 rr
  -> 10.244.17.177:80             Masq    1      0          0
TCP  10.96.0.1:443 rr
  -> 10.69.1.160:6443             Masq    1      0          0
TCP  10.96.0.10:53 rr
  -> 10.244.10.196:53             Masq    1      0          0
  -> 10.244.10.199:53             Masq    1      0          0
TCP  10.96.0.10:9153 rr
  -> 10.244.10.196:9153           Masq    1      0          0
  -> 10.244.10.199:9153           Masq    1      0          0
TCP  10.96.112.69:80 rr
  -> 10.244.17.177:80             Masq    1      0          0
TCP  10.97.108.187:81 rr
  -> 10.244.17.177:80             Masq    1      0          0
TCP  10.102.124.135:8000 rr
  -> 10.244.10.198:8000           Masq    1      0          0
TCP  10.109.104.52:443 rr
  -> 10.244.10.200:8443           Masq    1      0          0
TCP  10.244.10.192:30001 rr
  -> 10.244.10.200:8443           Masq    1      0          0
TCP  10.244.10.192:30002 rr
  -> 10.244.17.177:80             Masq    1      0          0
TCP  127.0.0.1:30001 rr
  -> 10.244.10.200:8443           Masq    1      0          0
TCP  127.0.0.1:30002 rr
  -> 10.244.17.177:80             Masq    1      0          0
TCP  172.17.0.1:30002 rr
  -> 10.244.17.177:80             Masq    1      0          0
UDP  10.96.0.10:53 rr
  -> 10.244.10.196:53             Masq    1      0          0
  -> 10.244.10.199:53             Masq    1      0          0
# 访问流程
curl service ip -> kube-ipvs0(virtual server) -> pod(real server)
# IPVS和Iptables的比较
# Iptables
- 灵活,功能强大
- 规则遍历匹配和更新,呈线性时延
# IPVS
- 工作在内核态,有更好的性能
- 调度算法丰富:rr(轮询),wrr(加强轮询),lc(最小连接),wlc(加强最小连接),ip hash(HASH)...
# ServiceDNS名称
# CoreDNS
是一个DNS服务器,Kubernetes默认采用,以Pod部署在集群中,CoreDNS服务监视Kubernetes API,为每一个Service创建DNS记录用于域名解析(解析名称和对应关系)。
CoreDNS YAML文件 (opens new window)(了解)
# ClusterIP A记录格式
<service-name>.<namespace-name>.svc.cluster.local
示例:my-svc.my-namespace.svc.cluster.local
# Ingress
# Ingress为弥补NodePort不足而生
# NodePort存在的不足
- 一个端口只能一个服务使用,端口需提前规划
- 只支持4层负载均衡
# Ingress是什么
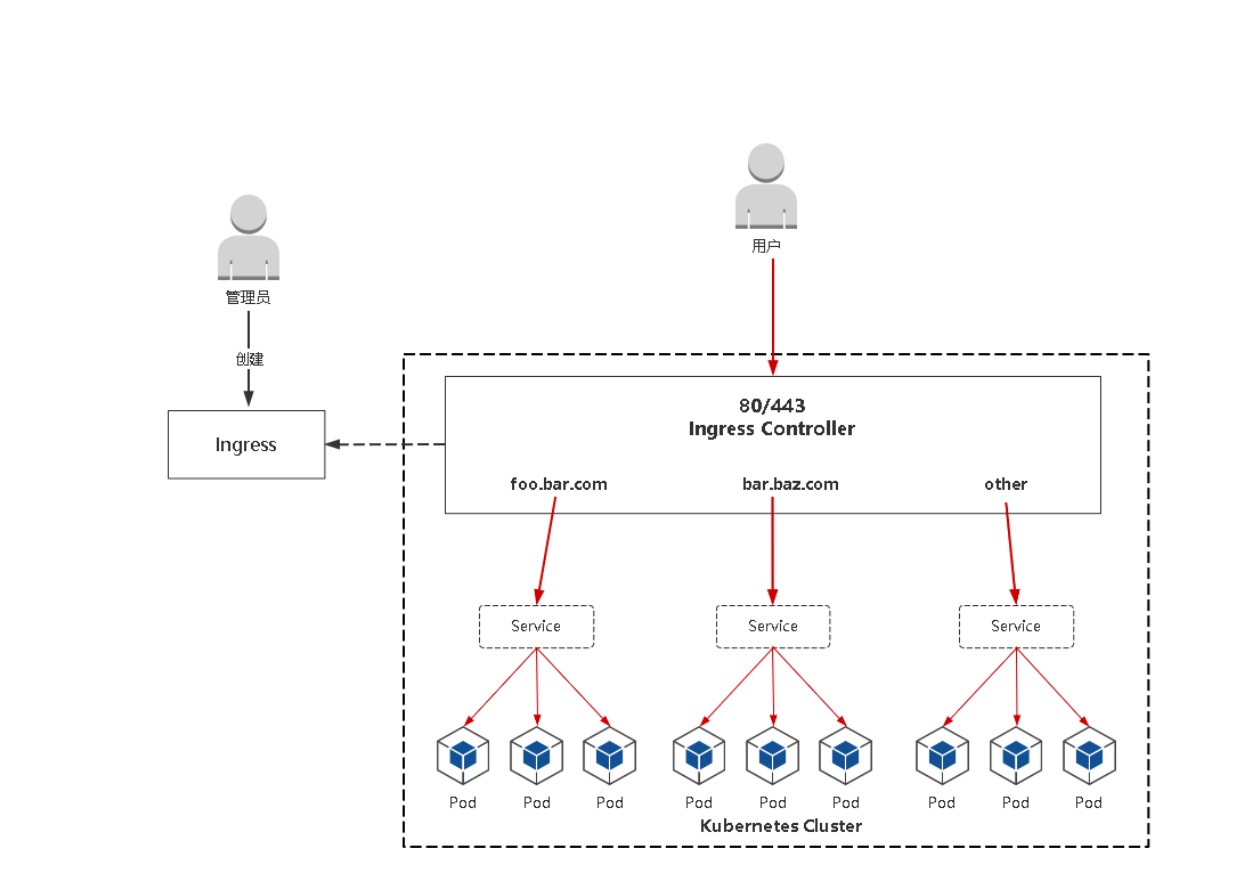
- Ingress公开了从集群外部到集群内服务的HTTP和HTTPS路由的规则集合,而具体实现流量路由则是由Ingress Controller负责。
- ingress:K8s中的一个抽象资源,给管理员 提供一个暴露应用的入口定义方法
- Ingress Controller:根据Ingress生成具体 的路由规则,并对Pod负载均衡器
# IngressController是什么
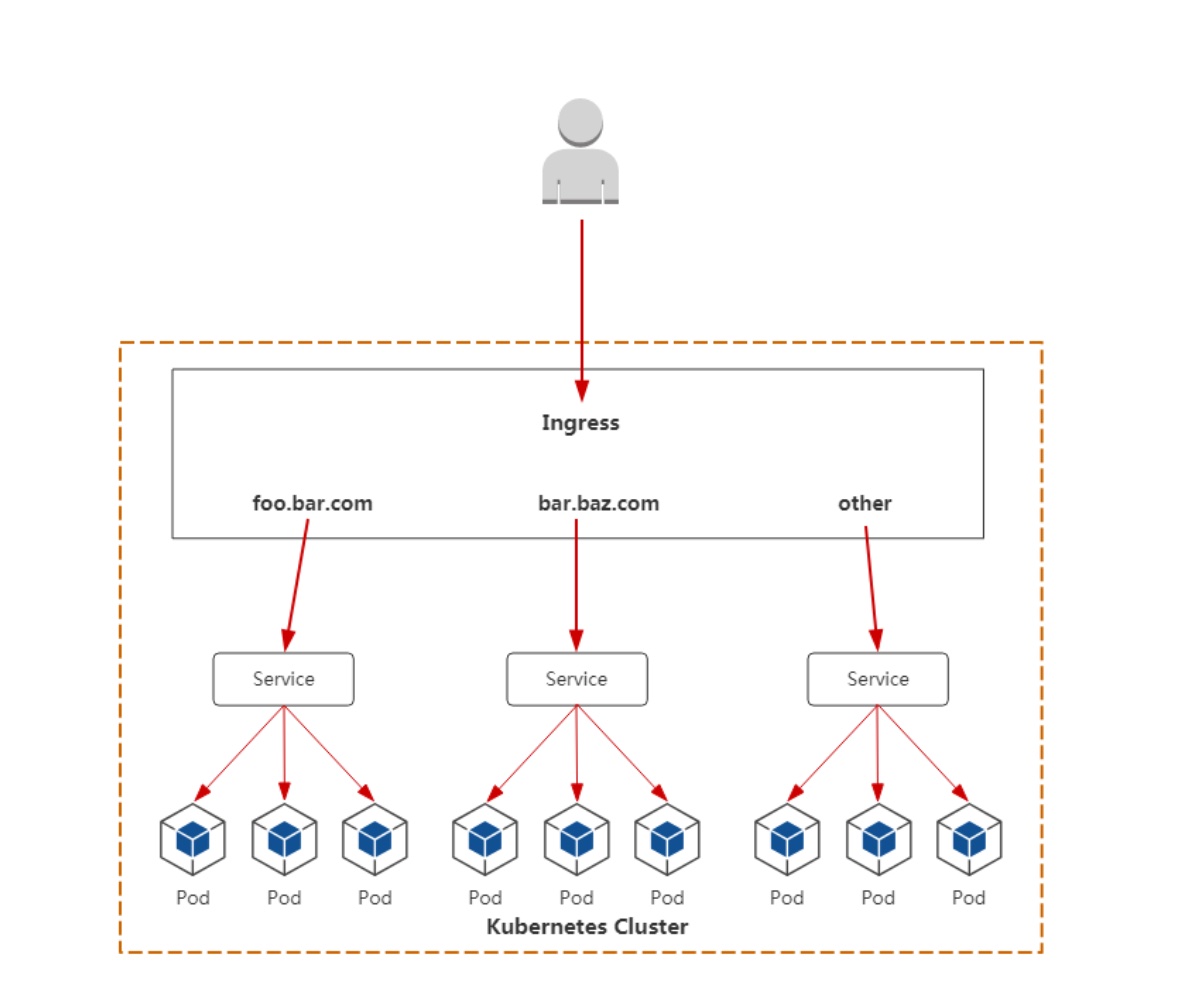
Ingress管理的负载均衡器,为集群提供全局的负载均衡能力。
# 使用流程
- 部署Ingress Controller
- 创建Ingress规则
Ingress Controller有很多实现,我们这里采用官方维护的Nginx控制器。
- 下载YAML文件
wget https://raw.githubusercontent.com/kubernetes/ingress-nginx/nginx-0.30.0/deploy/static/mandatory.yaml(课件中名称是ingress-controller.yaml)
YAML文件
文件有点长,不过因为网络问题下载不下来的话,可以拷贝以下文件
apiVersion: v1
kind: Namespace
metadata:
  name: ingress-nginx
  labels:
    app.kubernetes.io/name: ingress-nginx
    app.kubernetes.io/part-of: ingress-nginx

---

kind: ConfigMap
apiVersion: v1
metadata:
  name: nginx-configuration
  namespace: ingress-nginx
  labels:
    app.kubernetes.io/name: ingress-nginx
    app.kubernetes.io/part-of: ingress-nginx

---
kind: ConfigMap
apiVersion: v1
metadata:
  name: tcp-services
  namespace: ingress-nginx
  labels:
    app.kubernetes.io/name: ingress-nginx
    app.kubernetes.io/part-of: ingress-nginx

---
kind: ConfigMap
apiVersion: v1
metadata:
  name: udp-services
  namespace: ingress-nginx
  labels:
    app.kubernetes.io/name: ingress-nginx
    app.kubernetes.io/part-of: ingress-nginx

---
apiVersion: v1
kind: ServiceAccount
metadata:
  name: nginx-ingress-serviceaccount
  namespace: ingress-nginx
  labels:
    app.kubernetes.io/name: ingress-nginx
    app.kubernetes.io/part-of: ingress-nginx

---
apiVersion: rbac.authorization.k8s.io/v1beta1
kind: ClusterRole
metadata:
  name: nginx-ingress-clusterrole
  labels:
    app.kubernetes.io/name: ingress-nginx
    app.kubernetes.io/part-of: ingress-nginx
rules:
  - apiGroups:
      - ""
    resources:
      - configmaps
      - endpoints
      - nodes
      - pods
      - secrets
    verbs:
      - list
      - watch
  - apiGroups:
      - ""
    resources:
      - nodes
    verbs:
      - get
  - apiGroups:
      - ""
    resources:
      - services
    verbs:
      - get
      - list
      - watch
  - apiGroups:
      - ""
    resources:
      - events
    verbs:
      - create
      - patch
  - apiGroups:
      - "extensions"
      - "networking.k8s.io"
    resources:
      - ingresses
    verbs:
      - get
      - list
      - watch
  - apiGroups:
      - "extensions"
      - "networking.k8s.io"
    resources:
      - ingresses/status
    verbs:
      - update

---
apiVersion: rbac.authorization.k8s.io/v1beta1
kind: Role
metadata:
  name: nginx-ingress-role
  namespace: ingress-nginx
  labels:
    app.kubernetes.io/name: ingress-nginx
    app.kubernetes.io/part-of: ingress-nginx
rules:
  - apiGroups:
      - ""
    resources:
      - configmaps
      - pods
      - secrets
      - namespaces
    verbs:
      - get
  - apiGroups:
      - ""
    resources:
      - configmaps
    resourceNames:
      # Defaults to "<election-id>-<ingress-class>"
      # Here: "<ingress-controller-leader>-<nginx>"
      # This has to be adapted if you change either parameter
      # when launching the nginx-ingress-controller.
      - "ingress-controller-leader-nginx"
    verbs:
      - get
      - update
  - apiGroups:
      - ""
    resources:
      - configmaps
    verbs:
      - create
  - apiGroups:
      - ""
    resources:
      - endpoints
    verbs:
      - get

---
apiVersion: rbac.authorization.k8s.io/v1beta1
kind: RoleBinding
metadata:
  name: nginx-ingress-role-nisa-binding
  namespace: ingress-nginx
  labels:
    app.kubernetes.io/name: ingress-nginx
    app.kubernetes.io/part-of: ingress-nginx
roleRef:
  apiGroup: rbac.authorization.k8s.io
  kind: Role
  name: nginx-ingress-role
subjects:
  - kind: ServiceAccount
    name: nginx-ingress-serviceaccount
    namespace: ingress-nginx

---
apiVersion: rbac.authorization.k8s.io/v1beta1
kind: ClusterRoleBinding
metadata:
  name: nginx-ingress-clusterrole-nisa-binding
  labels:
    app.kubernetes.io/name: ingress-nginx
    app.kubernetes.io/part-of: ingress-nginx
roleRef:
  apiGroup: rbac.authorization.k8s.io
  kind: ClusterRole
  name: nginx-ingress-clusterrole
subjects:
  - kind: ServiceAccount
    name: nginx-ingress-serviceaccount
    namespace: ingress-nginx

---

apiVersion: apps/v1
kind: DaemonSet
metadata:
  name: nginx-ingress-controller
  namespace: ingress-nginx
  labels:
    app.kubernetes.io/name: ingress-nginx
    app.kubernetes.io/part-of: ingress-nginx
spec:
  selector:
    matchLabels:
      app.kubernetes.io/name: ingress-nginx
      app.kubernetes.io/part-of: ingress-nginx
  template:
    metadata:
      labels:
        app.kubernetes.io/name: ingress-nginx
        app.kubernetes.io/part-of: ingress-nginx
      annotations:
        prometheus.io/port: "10254"
        prometheus.io/scrape: "true"
    spec:
      hostNetwork: true
      # wait up to five minutes for the drain of connections
      terminationGracePeriodSeconds: 300
      serviceAccountName: nginx-ingress-serviceaccount
      nodeSelector:
        kubernetes.io/os: linux
      containers:
        - name: nginx-ingress-controller
          image: lizhenliang/nginx-ingress-controller:0.30.0
          args:
            - /nginx-ingress-controller
            - --configmap=$(POD_NAMESPACE)/nginx-configuration
            - --tcp-services-configmap=$(POD_NAMESPACE)/tcp-services
            - --udp-services-configmap=$(POD_NAMESPACE)/udp-services
            - --publish-service=$(POD_NAMESPACE)/ingress-nginx
            - --annotations-prefix=nginx.ingress.kubernetes.io
          securityContext:
            allowPrivilegeEscalation: true
            capabilities:
              drop:
                - ALL
              add:
                - NET_BIND_SERVICE
            # www-data -> 101
            runAsUser: 101
          env:
            - name: POD_NAME
              valueFrom:
                fieldRef:
                  fieldPath: metadata.name
            - name: POD_NAMESPACE
              valueFrom:
                fieldRef:
                  fieldPath: metadata.namespace
          ports:
            - name: http
              containerPort: 80
              protocol: TCP
            - name: https
              containerPort: 443
              protocol: TCP
          livenessProbe:
            failureThreshold: 3
            httpGet:
              path: /healthz
              port: 10254
              scheme: HTTP
            initialDelaySeconds: 10
            periodSeconds: 10
            successThreshold: 1
            timeoutSeconds: 10
          readinessProbe:
            failureThreshold: 3
            httpGet:
              path: /healthz
              port: 10254
              scheme: HTTP
            periodSeconds: 10
            successThreshold: 1
            timeoutSeconds: 10
          lifecycle:
            preStop:
              exec:
                command:
                  - /wait-shutdown

---

apiVersion: v1
kind: LimitRange
metadata:
  name: ingress-nginx
  namespace: ingress-nginx
  labels:
    app.kubernetes.io/name: ingress-nginx
    app.kubernetes.io/part-of: ingress-nginx
spec:
  limits:
  - min:
      memory: 90Mi
      cpu: 100m
    type: Container
- 修改YAML
镜像地址修改成国内的:lizhenliang/nginx-ingress-controller:0.30.0
将Ingress Controller暴露,一般使用宿主机网络(hostNetwork: true)或者使用NodePort
使用DaemonSet的原因是,这种类型会在每个节点上去部署一个ingress-controller, 而ingress-controller也只会在自己的当前节点对80和443端口进行监听,为了保证高可用,所以我们使用DaemonSet的方式
上诉yaml已经修改好了
# Pod与Ingress的关系
使用ingress暴露service
查看即将暴露的service
$ kubectl get svc
NAME             TYPE        CLUSTER-IP      EXTERNAL-IP   PORT(S)        AGE
web              NodePort    10.97.108.187   <none>        81:30002/TCP   3d1h
web-cluster-ip   ClusterIP   10.96.112.69    <none>        80/TCP         3d1h
可以看到,之前web这个服务,我们使用的nodePort的方式部署,所以能通通过宿主机的30002端口访问,但web-cluster-ip这个service我们没有对外进行暴露,只能在集群内部访问,所以接下来我们使用ingress将web-cluster-ip对外暴露
给ingress controller创建规则
apiVersion: networking.k8s.io/v1
kind: Ingress
metadata:
  name: liuxiaolu
spec:
  rules:
  - host: web.liuxiaolu.cn
    http:
      paths:
      - path: /
        pathType: Prefix
        backend:
          service:
            name: web-cluster-ip
            port:
              number: 80
执行
$ kubectl apply -f ingress.yaml
ingress.networking.k8s.io/aliangedu-https created
$ vi ingress.yaml
$ kubectl get ingress
NAME              CLASS    HOSTS              ADDRESS   PORTS   AGE
aliangedu-https   <none>   web.aliangedu.cn             80      23s
本地hosts中添加解析
master或者node节点的地址 web.liuxiaolu.cn通过浏览器访问web.liuxiaolu.cn进行验证