# IDE插件推荐(IntelliJ IDEA)
# Lombok
简化代码,可以通过注解,减少很多重复的代码编写。毕竟,作为一个程序员的自我修养就是,拒绝做重复工作。而通过使用注解,会在编译期帮我们自动生成不再需要重复编写的代码。
我们来简单举个栗子
在以前,我们写一个用户实体类,需要这样写
public class User {

    /**
     * 用户名
     */
    private String username;

    /**
     * 密码
     */
    private String password;

    public String getUsername() {
        return username;
    }

    public void setUsername(String username) {
        this.username = username;
    }

    public String getPassword() {
        return password;
    }

    public void setPassword(String password) {
        this.password = password;
    }
}
有Lombok之后,我们需要怎么写这个代码呢?
import lombok.Getter;
import lombok.Setter;

@Getter
@Setter
public class User {

    /**
     * 用户名
     */
    private String username;

    /**
     * 密码
     */
    private String password;
}
是不是简单很多了,少去了烦人的Getter,Setter。我们再来看看,编译之后,是什么效果。
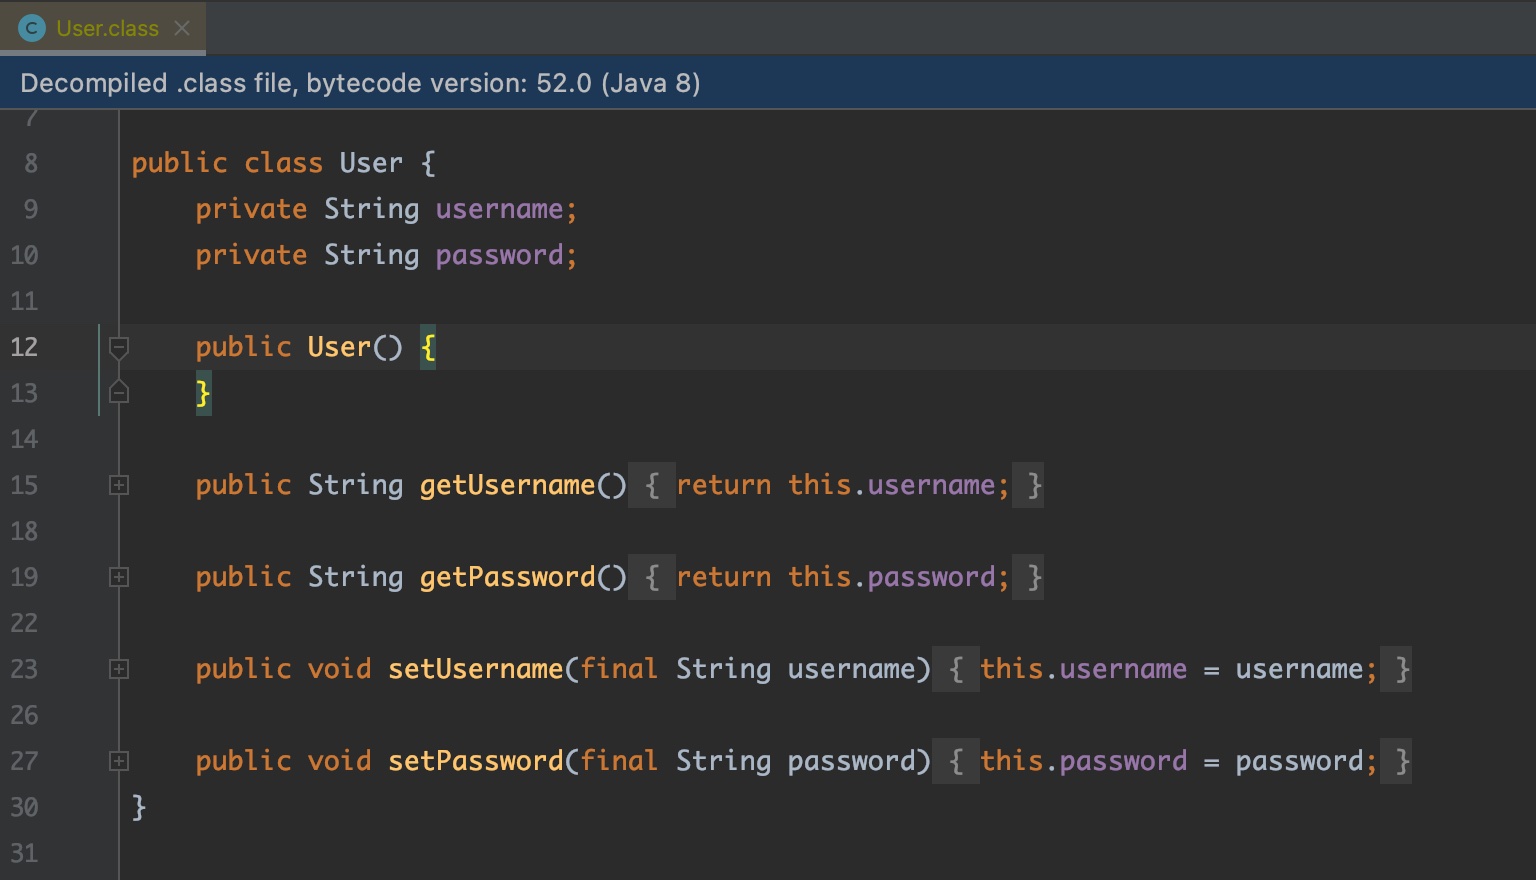
可以很明确的看到,其实编译之后,写法也就是我们最初的写法,只是这一项烦人的工作,被简单的注解所替代了。
加入maven依赖,安装好ide的插件,即可使用
<dependencies>
	<dependency>
		<groupId>org.projectlombok</groupId>
		<artifactId>lombok</artifactId>
		<version>1.18.6</version>
		<scope>provided</scope>
	</dependency>
</dependencies>
注解列表:
@Getter and @Setter 自动生成Getter,Setter代码
@FieldNameConstants
标注在类上,自动为所有字段生成一个常量,并以懒汉模式加载
// .java
import lombok.Getter;
import lombok.Setter;
import lombok.experimental.FieldNameConstants;

@Getter
@Setter
@FieldNameConstants
public class User {

    /**
     * 用户名
     */
    private String username;

    /**
     * 密码
     */
    private String password;
}

// .class
public class User {
    private String username;
    private String password;

    public User() {
    }

    public String getUsername() {
        return this.username;
    }

    public String getPassword() {
        return this.password;
    }

    public void setUsername(final String username) {
        this.username = username;
    }

    public void setPassword(final String password) {
        this.password = password;
    }

    public static final class Fields {
        public static final String username = "username";
        public static final String password = "password";

        private Fields() {
        }
    }
}
@ToString
自动生成toString()方法
// .java
import lombok.Getter;
import lombok.Setter;
import lombok.ToString;

@Getter
@Setter
@ToString
public class User {

    /**
     * 用户名
     */
    private String username;

    /**
     * 密码
     */
    private String password;
}

// .class
public class User {
    private String username;
    private String password;

    public User() {
    }

    public String getUsername() {
        return this.username;
    }

    public String getPassword() {
        return this.password;
    }

    public void setUsername(final String username) {
        this.username = username;
    }

    public void setPassword(final String password) {
        this.password = password;
    }

    public String toString() {
        return "User(username=" + this.getUsername() + ", password=" + this.getPassword() + ")";
    }
}
@EqualsAndHashCode
自动生成equals和hashcode方法
// .java
@Getter
@Setter
@EqualsAndHashCode
public class User {

    /**
     * 用户名
     */
    private String username;

    /**
     * 密码
     */
    private String password;
}

// .class
public class User {
    private String username;
    private String password;

    public User() {
    }

    public String getUsername() {
        return this.username;
    }

    public String getPassword() {
        return this.password;
    }

    public void setUsername(final String username) {
        this.username = username;
    }

    public void setPassword(final String password) {
        this.password = password;
    }

    public boolean equals(final Object o) {
        if (o == this) {
            return true;
        } else if (!(o instanceof User)) {
            return false;
        } else {
            User other = (User)o;
            if (!other.canEqual(this)) {
                return false;
            } else {
                Object this$username = this.getUsername();
                Object other$username = other.getUsername();
                if (this$username == null) {
                    if (other$username != null) {
                        return false;
                    }
                } else if (!this$username.equals(other$username)) {
                    return false;
                }

                Object this$password = this.getPassword();
                Object other$password = other.getPassword();
                if (this$password == null) {
                    if (other$password != null) {
                        return false;
                    }
                } else if (!this$password.equals(other$password)) {
                    return false;
                }

                return true;
            }
        }
    }

    protected boolean canEqual(final Object other) {
        return other instanceof User;
    }

    public int hashCode() {
        int PRIME = true;
        int result = 1;
        Object $username = this.getUsername();
        int result = result * 59 + ($username == null ? 43 : $username.hashCode());
        Object $password = this.getPassword();
        result = result * 59 + ($password == null ? 43 : $password.hashCode());
        return result;
    }
}
@AllArgsConstructor, @RequiredArgsConstructor and @NoArgsConstructor
- AllArgsConstructor - 自动生成包含所有字段的构造函数
- RequiredArgsConstructor - // todo
- NoArgsConstructor - 自动生成空的构造函数
@Log, @Log4j, @Log4j2, @Slf4j, @XSlf4j, @CommonsLog, @JBossLog, @Flogger, @CustomLog
这个注解用在类上,可以省去从日志工厂生成日志对象这一步,直接进行日志记录,具体注解根据日志工具的不同而不同,同时,可以在注解中使用topic来指定生成log对象时的类名。不同的日志注解总结如下(上面是注解,下面是实际作用):
@CommonsLog
private static final org.apache.commons.logging.Log log = org.apache.commons.logging.LogFactory.getLog(LogExample.class);
@JBossLog
private static final org.jboss.logging.Logger log = org.jboss.logging.Logger.getLogger(LogExample.class);
@Log
private static final java.util.logging.Logger log = java.util.logging.Logger.getLogger(LogExample.class.getName());
@Log4j
private static final org.apache.log4j.Logger log = org.apache.log4j.Logger.getLogger(LogExample.class);
@Log4j2
private static final org.apache.logging.log4j.Logger log = org.apache.logging.log4j.LogManager.getLogger(LogExample.class);
@Slf4j
private static final org.slf4j.Logger log = org.slf4j.LoggerFactory.getLogger(LogExample.class);
@XSlf4j
private static final org.slf4j.ext.XLogger log = org.slf4j.ext.XLoggerFactory.getXLogger(LogExample.class);
@Data
效果等同于同时加上@Getter,@Setter,@EqualsAndHashcode,@ToString
@Builder
Builder模式,创建User的代码我们可以这样写, 链接调用,十分方便
User.builder()
  	.username("xx")
  	.password("xx")
  	.build();
@SuperBuilder - //todo
@Singular
与@Builder注解配合使用,为集合属性添加add方法
@Delegate
代理模式,把字段的代理方法代理给类,默认代理所有方法
// .java
import lombok.Getter;
import lombok.Setter;
import lombok.experimental.Delegate;

@Getter
@Setter
public class User {

    /**
     * 用户名
     */
    @Delegate
    private String username;

    /**
     * 密码
     */
    private String password;
}

//.class
public class User {
    private String username;
    private String password;

    public User() {
    }

    public String getUsername() {
        return this.username;
    }

    public String getPassword() {
        return this.password;
    }

    public void setUsername(final String username) {
        this.username = username;
    }

    public void setPassword(final String password) {
        this.password = password;
    }

    public int length() {
        return this.getUsername().length();
    }

    public boolean isEmpty() {
        return this.getUsername().isEmpty();
    }

    public char charAt(final int arg0) {
        return this.getUsername().charAt(arg0);
    }

    public int codePointAt(final int arg0) {
        return this.getUsername().codePointAt(arg0);
    }

    public int codePointBefore(final int arg0) {
        return this.getUsername().codePointBefore(arg0);
    }

    public int codePointCount(final int arg0, final int arg1) {
        return this.getUsername().codePointCount(arg0, arg1);
    }

    public int offsetByCodePoints(final int arg0, final int arg1) {
        return this.getUsername().offsetByCodePoints(arg0, arg1);
    }

    public void getChars(final int arg0, final int arg1, final char[] arg2, final int arg3) {
        this.getUsername().getChars(arg0, arg1, arg2, arg3);
    }

    /** @deprecated */
    @Deprecated
    public void getBytes(final int arg0, final int arg1, final byte[] arg2, final int arg3) {
        this.getUsername().getBytes(arg0, arg1, arg2, arg3);
    }

    public byte[] getBytes(final String arg0) throws UnsupportedEncodingException {
        return this.getUsername().getBytes(arg0);
    }

    public byte[] getBytes(final Charset arg0) {
        return this.getUsername().getBytes(arg0);
    }

    public byte[] getBytes() {
        return this.getUsername().getBytes();
    }

    public boolean contentEquals(final StringBuffer arg0) {
        return this.getUsername().contentEquals(arg0);
    }

    public boolean contentEquals(final CharSequence arg0) {
        return this.getUsername().contentEquals(arg0);
    }

    public boolean equalsIgnoreCase(final String arg0) {
        return this.getUsername().equalsIgnoreCase(arg0);
    }

    public int compareTo(final String arg0) {
        return this.getUsername().compareTo(arg0);
    }

    public int compareToIgnoreCase(final String arg0) {
        return this.getUsername().compareToIgnoreCase(arg0);
    }

    public boolean regionMatches(final int arg0, final String arg1, final int arg2, final int arg3) {
        return this.getUsername().regionMatches(arg0, arg1, arg2, arg3);
    }

    public boolean regionMatches(final boolean arg0, final int arg1, final String arg2, final int arg3, final int arg4) {
        return this.getUsername().regionMatches(arg0, arg1, arg2, arg3, arg4);
    }

    public boolean startsWith(final String arg0, final int arg1) {
        return this.getUsername().startsWith(arg0, arg1);
    }

    public boolean startsWith(final String arg0) {
        return this.getUsername().startsWith(arg0);
    }

    public boolean endsWith(final String arg0) {
        return this.getUsername().endsWith(arg0);
    }

    public int indexOf(final int arg0) {
        return this.getUsername().indexOf(arg0);
    }

    public int indexOf(final int arg0, final int arg1) {
        return this.getUsername().indexOf(arg0, arg1);
    }

    public int lastIndexOf(final int arg0) {
        return this.getUsername().lastIndexOf(arg0);
    }

    public int lastIndexOf(final int arg0, final int arg1) {
        return this.getUsername().lastIndexOf(arg0, arg1);
    }

    public int indexOf(final String arg0) {
        return this.getUsername().indexOf(arg0);
    }

    public int indexOf(final String arg0, final int arg1) {
        return this.getUsername().indexOf(arg0, arg1);
    }

    public int lastIndexOf(final String arg0) {
        return this.getUsername().lastIndexOf(arg0);
    }

    public int lastIndexOf(final String arg0, final int arg1) {
        return this.getUsername().lastIndexOf(arg0, arg1);
    }

    public String substring(final int arg0) {
        return this.getUsername().substring(arg0);
    }

    public String substring(final int arg0, final int arg1) {
        return this.getUsername().substring(arg0, arg1);
    }

    public CharSequence subSequence(final int arg0, final int arg1) {
        return this.getUsername().subSequence(arg0, arg1);
    }

    public String concat(final String arg0) {
        return this.getUsername().concat(arg0);
    }

    public String replace(final char arg0, final char arg1) {
        return this.getUsername().replace(arg0, arg1);
    }

    public boolean matches(final String arg0) {
        return this.getUsername().matches(arg0);
    }

    public boolean contains(final CharSequence arg0) {
        return this.getUsername().contains(arg0);
    }

    public String replaceFirst(final String arg0, final String arg1) {
        return this.getUsername().replaceFirst(arg0, arg1);
    }

    public String replaceAll(final String arg0, final String arg1) {
        return this.getUsername().replaceAll(arg0, arg1);
    }

    public String replace(final CharSequence arg0, final CharSequence arg1) {
        return this.getUsername().replace(arg0, arg1);
    }

    public String[] split(final String arg0, final int arg1) {
        return this.getUsername().split(arg0, arg1);
    }

    public String[] split(final String arg0) {
        return this.getUsername().split(arg0);
    }

    public String toLowerCase(final Locale arg0) {
        return this.getUsername().toLowerCase(arg0);
    }

    public String toLowerCase() {
        return this.getUsername().toLowerCase();
    }

    public String toUpperCase(final Locale arg0) {
        return this.getUsername().toUpperCase(arg0);
    }

    public String toUpperCase() {
        return this.getUsername().toUpperCase();
    }

    public String trim() {
        return this.getUsername().trim();
    }

    public char[] toCharArray() {
        return this.getUsername().toCharArray();
    }

    public String intern() {
        return this.getUsername().intern();
    }

    public IntStream chars() {
        return this.getUsername().chars();
    }

    public IntStream codePoints() {
        return this.getUsername().codePoints();
    }
}
挺奇怪的一个方法,编译之后将String的公共非静态方法全拷贝进来了,感觉是没啥用的
@Value
与@Data类似,区别在于它会把所有成员变量默认定义为private final修饰,并且不会生成set方法,类也会标注为final类。
所以@Value更适合只读性更强的类,所以特殊情况下,还是可以使用的。
@Accessors
默认情况下没什么用,需要设置参数
- chain:为true时,setter链式返回,即setter的返回值为this
- fluent:为true时,默认设置chain为true,setter的方法名修改为字段名
@Wither - // todo
@With -// todo
@SneakyThrows
用try{} catch{}处理异常
// .java
public class User {

    /**
     * 用户名
     */
    private String username;

    /**
     * 密码
     */
    private String password;

    @SneakyThrows
    public void print(User user) {
        System.out.println(user);
    }
}

// .class
public class User {
    private String username;
    private String password;

    public User() {
    }

    public void print(User user) {
        try {
            System.out.println(user);
        } catch (Throwable var3) {
            throw var3;
        }
    }
}
@val
变量声明类型推断(很强的类型推断 var注解,在Java10之后就不能使用了)
// .java
public static void main(String[] args) {
  val set = new HashSet<String>();
  set.add("aa");
  System.out.println(set); //[aa]
}

// .class
public static void main(String[] args) {
  HashSet<String> set = new HashSet();
  set.add("aa");
  System.out.println(set);
}
@var
和val一样,官方文档中说区别就是var不加final修饰,但测试的效果是一样的
@UtilityClass - //todo
# GenerateAllSetter
一键调用一个对象的所有set方法并且赋予默认值 在对象字段多的时候非常方便,在做项目时,每层都有各自的实体对象需要相互转换,但是考虑BeanUtil.copyProperties()等这些工具的弊端,有些地方就需要手动的赋值时,有这个插件就会很方便,创建完对象后在变量名上面按Alt+Enter就会出来 generate all setter选项。
# Background image Plus
这是一款可以设置idea背景图片的插件,不但可以设置固体的图片,还可以设置一段时间后随机变化背景图片,以及设置图片的透明度等等。
Preferences -> Appearance & Behavior -> Appearance
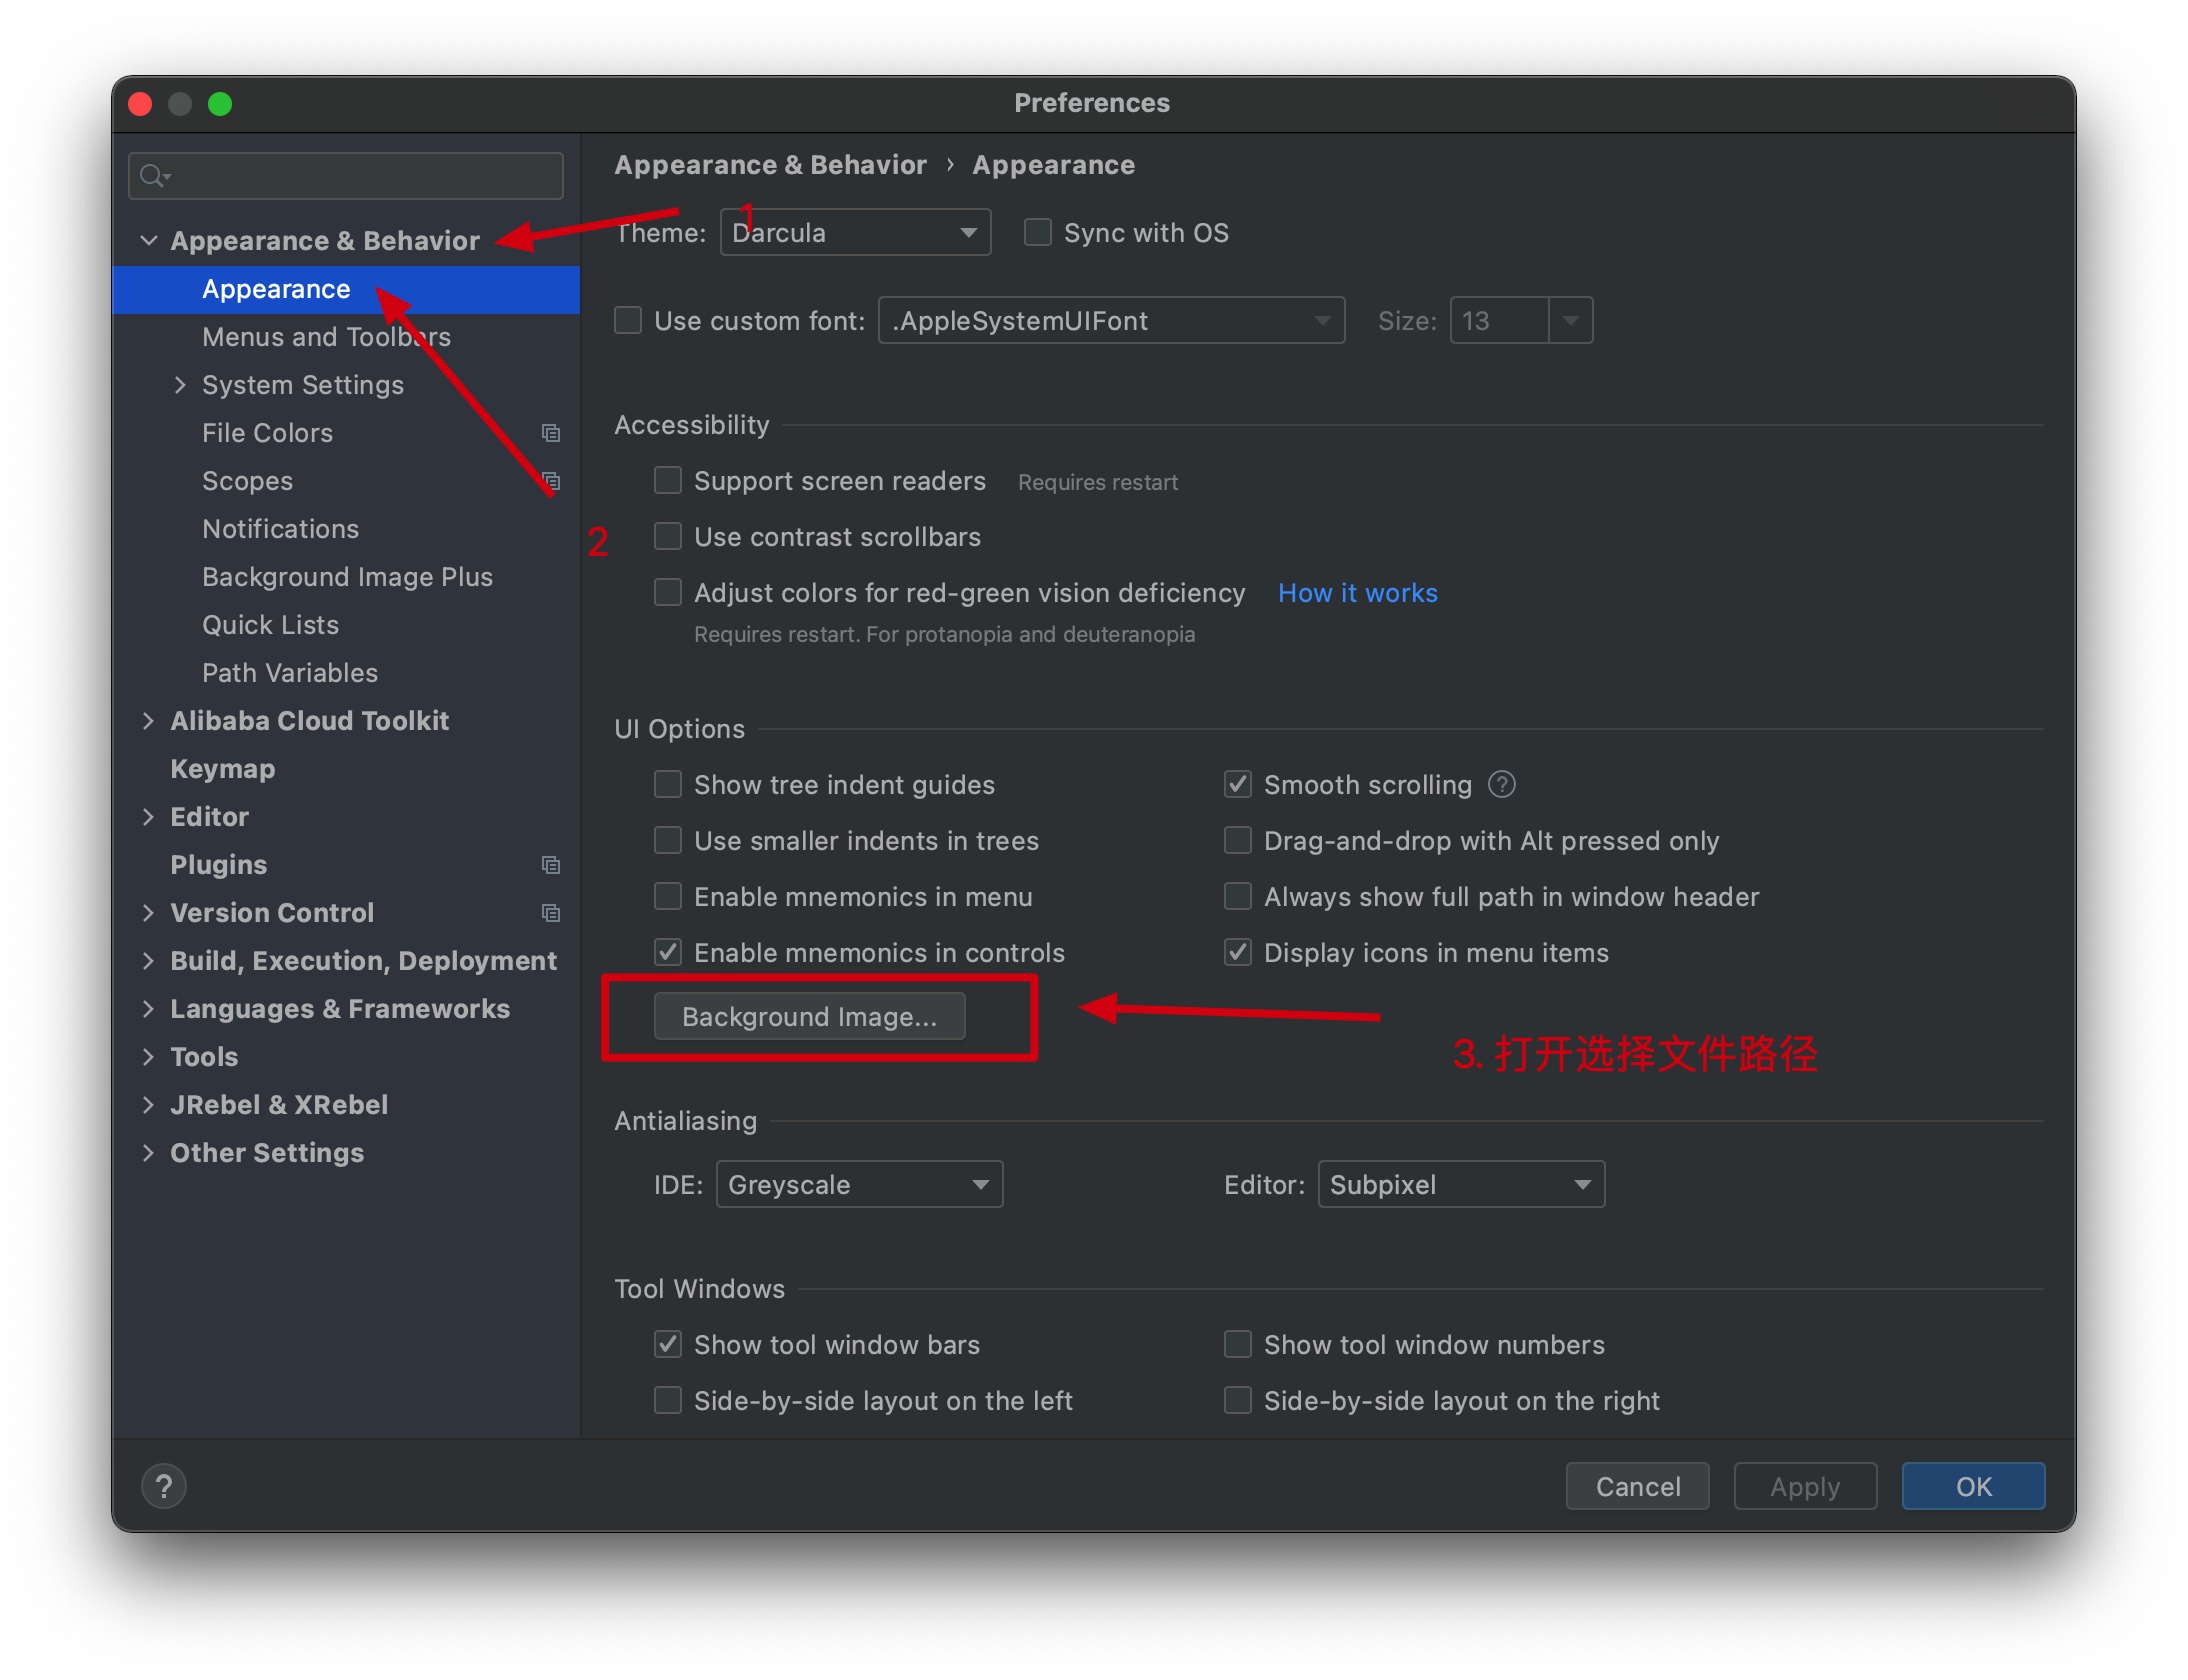
设置Background Image
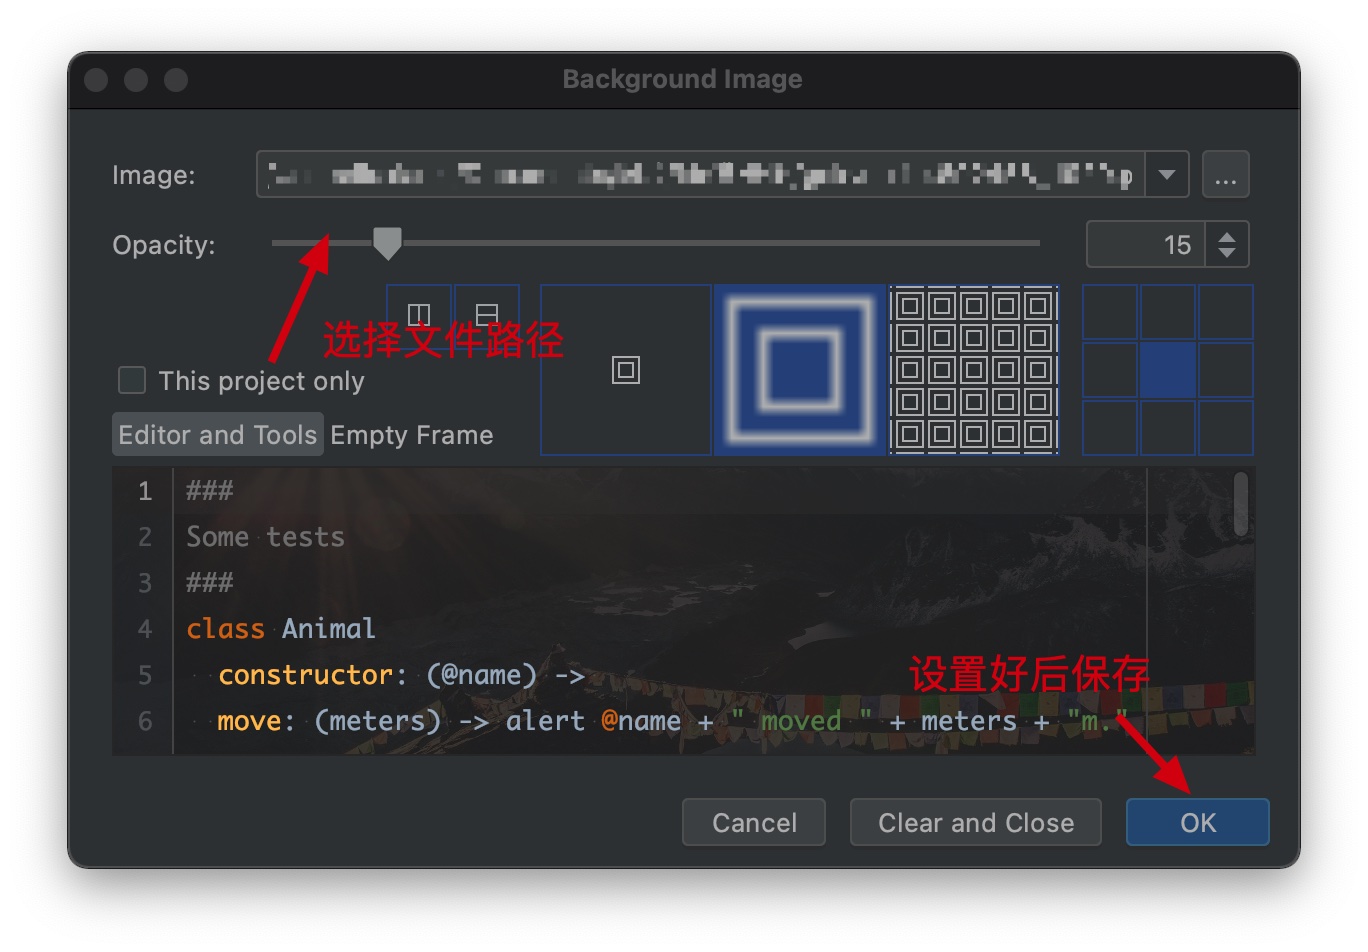
保存完成之后,重启ide即可
# Translation
这个插件可以在idea快速的进行中英文互译
# Grep Console
Grep, tail, filter, highlight... everything you need for a console (not supporting terminals). Also can highlight the editor...
Features:
- Change colors of matching text.
- Grep output into a new console tab.
- Change output or execute any action using custom groovy scripts or plugins.
- Filter out unwanted lines.
- Workaround for stdout/stderr stream mixing
- Fold output.
- Play sounds on matches.
- Clear Console on matches.
- Tail files*.
Editor actions:
- Apply highlights in the editor according to the plugin's console settings. (Main menu | Tools)
- Toggle highlight on all occurrences of the selected text in the editor. (Ctrl+Alt+F3; Editor Popup Menu; Main menu | Tools) *File Tailing: - Main menu | Tools | Open File in Console - Main Menu | Help | Tail (IntelliJ) Log in Console - Project View ToolWindow | right click context menu | Tail - Drag&Drop "Tail File" panel in main toolbar - http and Windows context menu integration - Encoding auto-detection
# RestfulTool
A set of auxiliary tools for Restful service development
- Provides a display window of Services tree
- Double click the URL to jump directly to the corresponding method definition
- A simple http request tool
- Support Spring system (Spring MVC / Spring Boot)
- Support JAX-RS
- Support
Navigate-> Request Servicesearch Mapping (Ctrl + Alt + /)
一套 Restful 服务开发辅助工具集
- 提供了一个 Services tree 的显示窗口
- 双击 URL 直接跳转到对应的方法定义
- 一个简单的 http 请求工具
- 支持 Spring 体系 (Spring MVC / Spring Boot)
- 支持 JAX-RS
- 支持
Navigate -> Request Service搜索 Mapping (Ctrl + Alt + /)
# BrowseWordAtCaret
Allows to easily browse next/previous word at caret and highlight other appearances of selected word. Usage: Browse with CTRL-ALT-UP, CTRL-ALT-DOWN (note: on default-keymap this shortcut is also for next/previous occurrence).
# String Manipulation
Case switching, sorting, filtering, incrementing, aligning to columns, grepping, escaping, encoding...
Case switching: Switch case (camelCase, kebab-lowercase, KEBAB-UPPERCASE, snake_case, SCREAMING_SNAKE_CASE, dot.case, words lowercase, First word capitalized, Words Capitalized, PascalCase)
- Toggle: SCREAMING_SNAKE_CASE / camelCase
- Toggle: snake_case / camelCase
- Toggle: kebab-case / snake_case
- Toggle: kebab-case / camelCase
- Toggle: dot.case / camelCase
- Toggle: PascalCase / camelCase
- Toggle: lowercase words / camelCase
- Toggle: First word capitalized / camelCase
- Toggle: Capitalized Words / camelCase
- To camelCase
- To snake_case
- To SCREAMING_SNAKE_CASE Capitalize
- To lower case
- To UPPER CASE Invert case -'Switch case' action can be customized, or new ones can be added in settings -when nothing is selected, then either nothing or whole line or a particular element is selected (report an issue if you find something to improve, each file type needs its own implementation to work flawlessly)
Un/Escape:
- Un/Escape selected Java text
- Un/Escape selected JavaScript text
- Un/Escape selected C# text (regular, verbatim, interpolated)
- Un/Escape selected HTML text
- Un/Escape selected JSON text
- Un/Escape selected XML text
- Un/Escape selected SQL text
- Un/Escape selected PHP text
- Convert diacritics (accents) to ASCII
- Convert non-ASCII to escaped Unicode
- Convert escaped Unicode to String
Encode/Decode:
- Encode selected text to MD5 Hex
- Encode selected text to SHA-1 Hex
- Encode selected text to SHA-256 Hex
- Encode selected text to SHA-512 Hex
- Encode selected text to SHA3-256 Hex
- Encode selected text to SHA3-512 Hex
- De/Encode selected text as URL
- De/Encode selected text to Base64 (+ zip/deflate)
- De/Encode selected text to Hex
- ISO Timestamp to Epoch Milliseconds
- Epoch Milliseconds to ISO Timestamp
Increment/Decrement:
- Increment/decrement all numbers found.
- Duplicate line and increment/decrement all numbers found.
- Create sequence - Keep first number, replace all other by incrementing
- Increment duplicate numbers
Sort with natural order or Collator:
- Reversing order of lines
- Shuffle lines
- Sort case-sensitive A-z
- Sort case-sensitive z-A
- Sort case-insensitive A-Z
- Sort case-insensitive Z-A
- Sort line length asc., desc.
- Sort hexadecimally
- Sort lines by subselection - only one selection/caret per line is handled
- Sort tokens (delimited text)
Align:
- Align carets/selections into a vertical line by inserting spaces
- Format selected text to columns/table by a chosen separator/delimiter and sort by columns
- Align text to left/center/right
Filter/Remove/Trim...:
- Grep selected text, All lines not matching input text wil be removed. (Does not work in column mode)
- Inverted Grep
- Trim selected text
- Trim all spaces in selected text
- Remove all spaces in selected text
- Remove duplicate lines
- Keep only duplicate lines
- Remove empty lines
- Remove all newlines
Other:
- Reverse Letters
- Swap Characters/Selections/Lines/Tokens
- Wrap or shift double quotes to single quotes to backticks
- Swap between double quotes and single quotes
- Switch file path separators: Windows<->UNIX
Actions are available under Edit menu, or via the shortcut "alt M" and "alt shift M". You can setup your own shortcuts for better usability. Popup can be customized in File | Settings | Appearance & Behavior | Menus and Toolbars.
# Free Mybatis plugin
A idea plugin for mybatis free-idea-mybatis is an enchange plugin for idea to supoort mybatis,here is the main functions:
- generate mapper xml files
- navigate from the code to mapper and from the mapper back to code
- auto code and error tips
- support mybatis generator gui
free-idea-mybatis是一款增强idea对mybatis支持的插件,主要功能如下:
- 生成mapper xml文件
- 快速从代码跳转到mapper及从mapper返回代码
- mybatis自动补全及语法错误提示
- 集成mybatis generator gui界面
# Codota AI Completions for Java and JavaScript
Better code completions using AI for Java and JavaScript. Codota uses the most advanced Machine Learning models to boost productivity and save time for developers. Supports IntelliJ, Android Studio, WebStorm, and PhpStorm
Codota completes lines of code based on millions of open source Java programs and your context helping you code faster with fewer errors. The following features are available with the new version of Codota:
- Full line AI autocomplete
- In line and relevant code examples
- Code suggestions based on your own coding practices Your code stays private. Codota doesn't send your code to the Codota server, we only send minimal contextual information from the currently edited file that allows us to make predictions based on your current local scope. Learn more. Installation is quick and simple, just follow the instructions here Go to our website to find popular Java code like Java date format snippets and Java timer examples Click here for more information. Terms & Conditions Contact support@codota.com for any question or issue. You can also report an issue in the Codota Plugin for Jetbrains repository in GitHub to allow others to see and participate in the discussion >. Codota Java supports IntelliJ IDEA version 2017.1 or higher Codota JavaScript supports IntelliJ IDEA or WebStorm version 2018.3 or higher
# Package Search
Find and manage dependencies for JVM and Kotlin Multiplatform projects. Supports Maven and Gradle projects. Please note that Gradle Kotlin build scripts aren’t supported yet.
# Alibaba Cloud Toolkit
A plugin for IDEs such as Eclipse or IntelliJ IDEA. Help developers develop more efficiently , test, diagnose, and deploy applications that are suitable for cloud operations.
Why use Alibaba Cloud Toolkit?
Zero cost:Free for all developer
Extremely efficient:Get rid of past recurring deployment methods, plug-in automated deployment
Three use scenarios, simple and convenient, get started quickly
Deploy to ECS.There is no need to switch between Maven, Git, and other O&M scripts and tools, and developers can configure it on a graphical interface to deploy applications to ECS in a sustainable and convenient manner.
Deploy to EDAS.Enterprise Distributed Application Services EDAS is a PaaS platform for applications and microservices that offers a wide range of application delivery and lightweight microservice solutions. For Alibaba Cloud EDAS developers, local applications and cloud deployments have been opened on the plugin.
Deploy to Kubernetes.Container Services Kubernetes Edition provides high-performance, scalable container application management capabilities that support full lifecycle management of enterprise-class Kubernetes containerized applications. For Alibaba Cloud Kubernetes developers, local applications and cloud deployments have been opened on the plugin.
# JUnitGenerator
自动生成单元测试代码
This plugin generates JUnit tests from right click 'Generate...' menu while focused on a java class. The unit test output code can be customized using a provided velocity template to format the code based on the origin class.
If a unit test is created where one already exists, the user is prompted for overwrite or merge operation. The merge operation allows the user to selectively create the target file content.
A future revision will allow the user to generate their own test case macros.
# CodeGlance
Embeds a code minimap similar to the one found in Sublime into the editor pane. Works with both light and dark themes using your customized colors for syntax highlighting.